

Read the Special Report
Click here to read the Special Report from William Critchley.
This report introduces the course and describes some of its history, as well as giving some insight into the proofreading profession.
Proofreading marks
 |
Change to bold typeface |
 |
Change to non bold typeface |
 |
Change to italic typeface |
 |
Change to roman (non italic) typeface |
 |
Change to upper case |
 |
Change to lower case |
| ‘Caret’ – insert specified text at this point | |
 |
‘Delete’ with bridges – delete and close up |
 |
Transpose (switch) the specified two areas of text |
 |
‘Run on’ text, instead of starting a new paragraph |
 |
Insert or change to an en dash |
 |
Indicated text is of doubtful accuracy – query it |
 |
‘Stet’ – leave the specified text as it is |
You’ll find a list of the main proofreading marks in use (marks for copy preparation and proof correction) on pages 105-107 of The Pocket Book of Proofreading. Some of the most common are shown in the table to the right.
Most of the time you’ll only use about a half dozen marks and these can be learnt very quickly.
If you’re starting proofreading for the first time, you may be anxious about using the correct marks. It’s actually more important in the beginning to able to notice the actual errors than it is to worry about marking them up correctly. But it doesn’t take very long to understand which marks to use and how to use them.
Write your corrections clearly in the margin, in left to right sequence, adjacent to the line or lines that have to be corrected. Both margins can be used for corrections, the tendency being to write in the left-hand margin for corrections to the left, and in the right-hand margin for corrections to the right.
Here are two examples from the book:
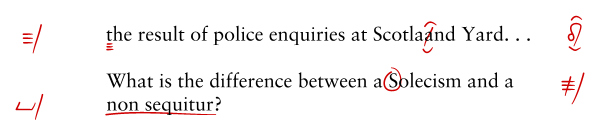
The four marks above (clockwise from top-left) are instructions for the typesetter to…
-
change lower case ‘t’ to capital ‘T’. The oblique or solidus (/) means that the instruction is complete/concluded
-
delete the extra ‘a’ in ‘Scotlaand’ and close up
-
change upper case ‘S’ to lower case ‘s’
-
change the two underlined words in roman typeface to italic, so it will be ‘non sequitur’.
Marking up proofs is really quite simple. There is an instruction you are giving, the ‘textual mark’, i.e. the mark through, on, over or under the text, which identifies the error (after you have found it of course!) and the ‘marginal mark’, which identifies the nature of the correction.
It’s actually easier than it looks. Aim to be clear, precise and consistent.